 Hisashi Space
November 3, 2026 · 16 min read
I Let Claude Code Control My iPhones. Here's What It Can Actually Do.
I let Claude Code control my iPhones.
Not a trick for a video. It started because Apple rejected my app and asked for a recording on a real iPhone. The video shows the idea in five minutes. This article has the parts the video skipped: the test code, the script around it, every failed run with the exact error, and the rules I put in code.
The short version
- There is no jailbreak and no hacking. It is Xcode's own UI testing (XCUITest), run on a real iPhone over a cable.
- Claude Code reads the screen two ways: a screenshot, and the list of every button and label. It taps by name, not by guessing pixels.
- I use it for three jobs: the review video Apple asked for, App Store screenshots, and changing iPhone settings.
- The review video test failed five times in a row on November 2. Each failure had a clear cause: a prefilled field, the keyboard, a permission dialog, and a shell script that died silently. All the fixes are below.
- It is not fast. The value is that run one hundred looks exactly like run one.
Why I needed it
My app is Ultenix for iPhone. It connects to Ultenix on the Mac, so you can reach your Mac's terminals from your phone.
Here is the review history of version 1.0.0.
| Date | What happened |
|---|---|
| October 1 | Submitted with a screen recording from the iPhone simulator |
| October 10 | Rejected. Apple asked for a video recorded on a real device |
| October 23 | Rejected again under guideline 2.1. Apple asked to see how the app works with the external device, the Mac |
| Today | Still rejected. Not resubmitted yet |
The October 10 fix was half a fix. I recorded on a real iPhone, but I recorded the built-in demo mode, not a real connection to a Mac. Apple's second message was clear: show the real flow.
So the job became: open the app on a real iPhone, pair it with a real Mac, show the Mac's terminals on the phone, send a command, and record it all. And do it again every time I build a new version.
How it works
Apple already ships everything you need. Here are the pieces I use.
| Piece | What it does |
|---|---|
| A tiny host app | Exists only so the UI test has something to attach to. Its whole screen is one line of text |
| A UI test target | Drives the real app from outside, by its bundle ID |
| A test plan | Turns on screen recording and keeps every screenshot |
xcodebuild test-without-building |
Runs the test on the iPhone over the cable |
xcrun devicectl |
Installs and removes the app on the device |
xcrun xcresulttool |
Pulls the recording out of the test result |
The test does not live inside the app. It is a separate small project that controls the app by bundle ID.
private let app = XCUIApplication(bundleIdentifier: "com.ultenix.mobile")
private let springboard = XCUIApplication(bundleIdentifier: "com.apple.springboard")
The second line matters. Permission dialogs ("Allow Ultenix to access your camera?") do not belong to your app. They belong to SpringBoard, the iPhone's home screen process. If you only look inside your app, you will never find them.
The recording comes for free from the test plan.
"defaultOptions" : {
  "preferScreenCapturesOverScreenshots" : true,
  "systemAttachmentLifetime" : "keepAlways",
  "uiTestingScreenshotsLifetime" : "keepAlways"
}
With these three lines, Xcode records the screen and keeps a snapshot of the screen for every action. In the last run on November 2, the result held one screen recording (78 seconds, 1290 by 2796), 14 UI snapshots and 18 recorded tap and type events.
How Claude reads the screen
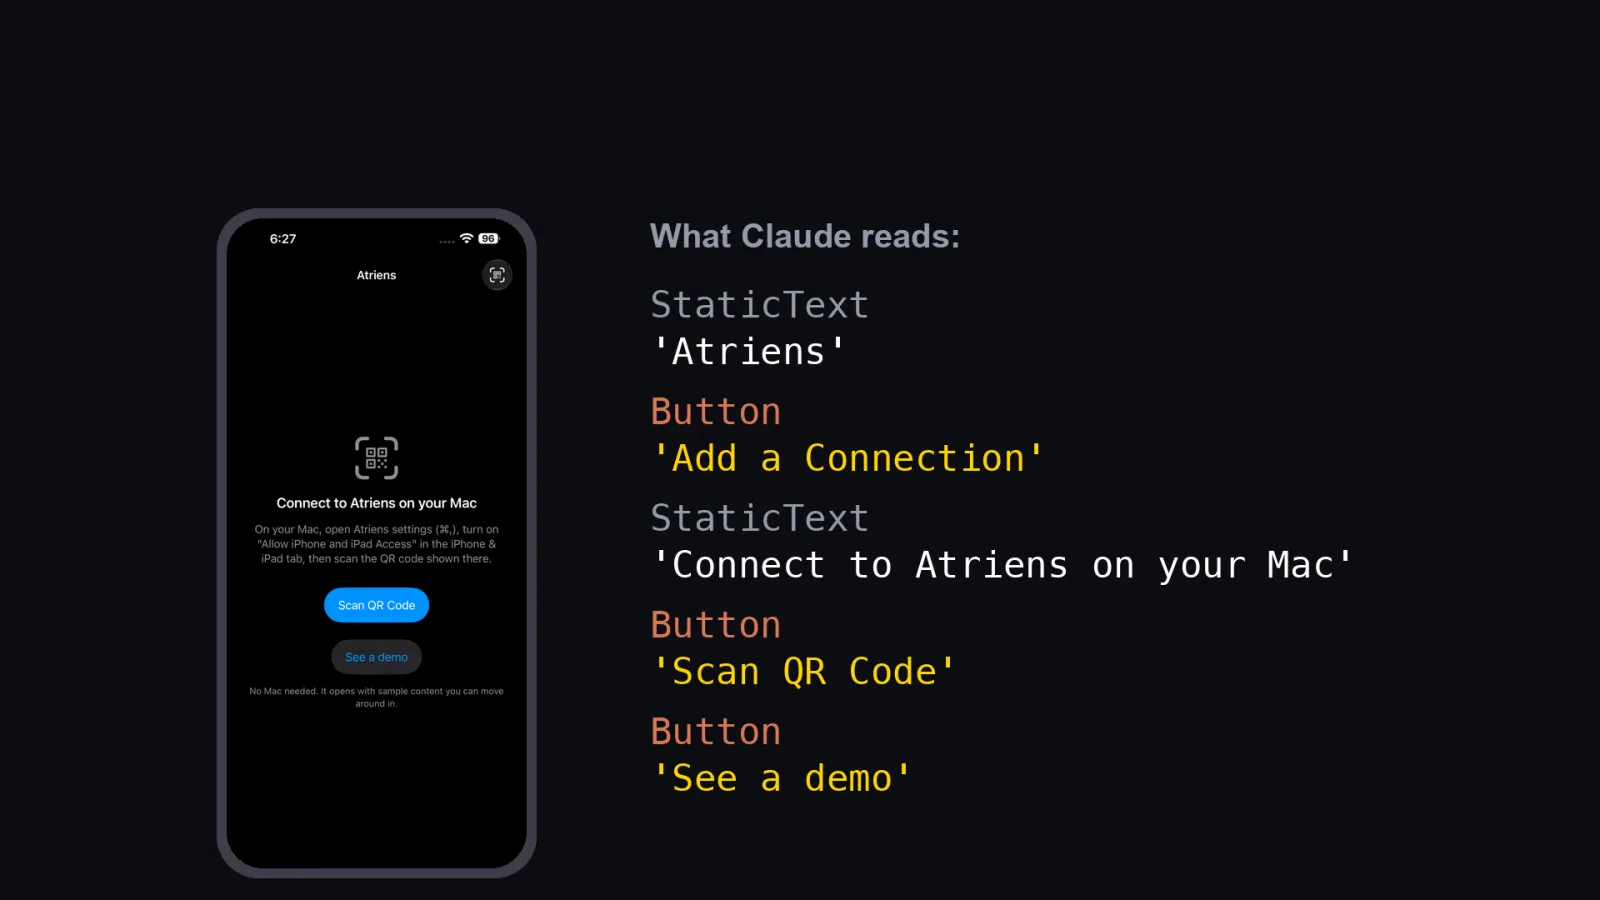
A screenshot alone is not enough to tap reliably. So the test finds things by their label, the same text VoiceOver would read.
private func element(_ label: String, timeout: TimeInterval = 15) -> XCUIElement {
  let exact = NSPredicate(format: "label == %@", label)
  let partial = NSPredicate(format: "label CONTAINS %@", label)
  let candidates = [
    app.buttons.matching(exact).firstMatch,
    app.buttons.matching(partial).firstMatch,
    app.staticTexts.matching(exact).firstMatch,
    app.descendants(matching: .any).matching(partial).firstMatch,
  ]
  let deadline = Date().addingTimeInterval(timeout)
  repeat {
    for c in candidates where c.exists && c.isHittable { return c }
    Thread.sleep(forTimeInterval: 0.3)
  } while Date() < deadline
  XCTFail("Not found: \(label)")
  return candidates[0]
}
The order is deliberate. An exact button first, then a partial match on buttons, then text, then anything. Partial matching is there because Ultenix's screens are a web view, and labels inside a web view sometimes carry extra text.
isHittable is the other half.
An element can exist and still be under the keyboard or behind a dialog.
Tapping it then fails, or worse, taps whatever is on top.
Permission dialogs get their own helper.
/// If a permission dialog (SpringBoard) appears, wait long enough to read it, then allow
private func allowSystemAlert(timeout: TimeInterval = 10) {
  let alert = springboard.alerts.firstMatch
  guard alert.waitForExistence(timeout: timeout) else { return }
  pause(3)
  // The allow button is on the right (last). Its name changes with the device language
  let buttons = alert.buttons.allElementsBoundByIndex
  if let allow = buttons.last, allow.exists {
    allow.tap()
  }
  pause()
}
It taps by position, not by the word "Allow", because the button text follows the device language. The three second pause is for the reviewer. A dialog that flashes for a tenth of a second does not prove anything in a review video.
The script around the test
The test is only the middle. A shell script does everything before and after it. Here is the shape of it, with account details removed.
#!/bin/bash
set -euo pipefail
D="$1"; IPA="$2"; OUT="$3"   # device ID, signed .ipa, output name

# Where to connect: the Mac's LAN address, the port Ultenix listens on, the pairing token
HOST=$(ipconfig getifaddr en0)
PID=$(ps -axo pid,comm | awk '/MacOS\/ultenix$/{print $1; exit}' || true)
PORT=$(lsof -nP -a -p "$PID" -iTCP -sTCP:LISTEN | awk 'NR>1{split($9,a,":");print a[2];exit}' || true)
TOKEN=<read from the Mac app's settings file>

xcodebuild build-for-testing -project DeviceVideo.xcodeproj -scheme DeviceVideo \
  -destination "id=$D" -derivedDataPath build <signing options> -quiet
# Reinstall, so the camera and network permission dialogs appear again
xcrun devicectl device uninstall app --device "$D" com.ultenix.mobile || true
xcrun devicectl device install app --device "$D" "$IPA"

# Meanwhile, capture only the Ultenix window on the Mac, without bringing it to the front
( while [ ! -f "$OUT.mac/stop" ]; do
    screencapture -x -o -l "$WID" -t jpg "$OUT.mac/<timestamp>.jpg"
  done ) &

TEST_RUNNER_ULTENIX_HOST="$HOST" TEST_RUNNER_ULTENIX_PORT="$PORT" TEST_RUNNER_ULTENIX_TOKEN="$TOKEN" \
  xcodebuild test-without-building ... -resultBundlePath "$OUT.xcresult" \
  -only-testing:DeviceVideoUITests/ReviewMacConnect \
  | sed "s/$TOKEN/<token>/g"

touch "$OUT.mac/stop"
xcrun xcresulttool export attachments --path "$OUT.xcresult" --output-path "$OUT.att"
cp "$(ls -S "$OUT.att"/*.mp4 | head -1)" "$OUT.mp4"
Four details worth copying:
TEST_RUNNER_is how you pass values into a UI test on a device. Xcode strips the prefix, and the test readsULTENIX_HOSTfrom its environment.- The script uninstalls the app first. Otherwise iOS remembers the permissions, and the dialogs Apple wants to see never appear.
- The token is masked in the log with
sed. The token field is also blurred in the final video. screencapture -ltakes one window by its ID. The Mac side is recorded without stealing focus from whatever I am doing. In the last run it saved 303 frames in about 89 seconds, roughly 3 frames a second.
The recording is the biggest .mp4 in the exported attachments.
That ls -S | head -1 line is the whole trick.
Five runs, five failures
On the evening of November 2, I ran the Mac connection test five times on an iPhone 14 Pro Max (iOS 27.2) in about eight minutes. None of them reached the end. There were four different causes, and every one was useful.
| Run | Time to fail | Where it stopped | Error from Xcode |
|---|---|---|---|
| 1 | 40 s | Typing into the Port field | Neither element nor any descendant has keyboard focus |
| 2 | 38 s | Typing into the Address field | Neither element nor any descendant has keyboard focus |
| 3 | 71 s | Opening a new terminal on the Mac | Not found: + |
| 4 | 73 s | Opening a new terminal on the Mac | Not found: + |
| 5 | 87 s | Text size button, after the terminal opened | Not found: A+ |
Run 5 did what Apple asked for. It paired with the Mac, connected over Wi-Fi, listed the Mac's terminals, and opened a new terminal on the Mac. It then stopped one step later, at a button that makes the text bigger.
For comparison, the older demo walkthrough on October 10 failed twice and then passed twice, at about 86 seconds each, on an iPhone 16 Pro Max.
Here is what went wrong in each case, and the fix.
Problem 1: the field that already had a value
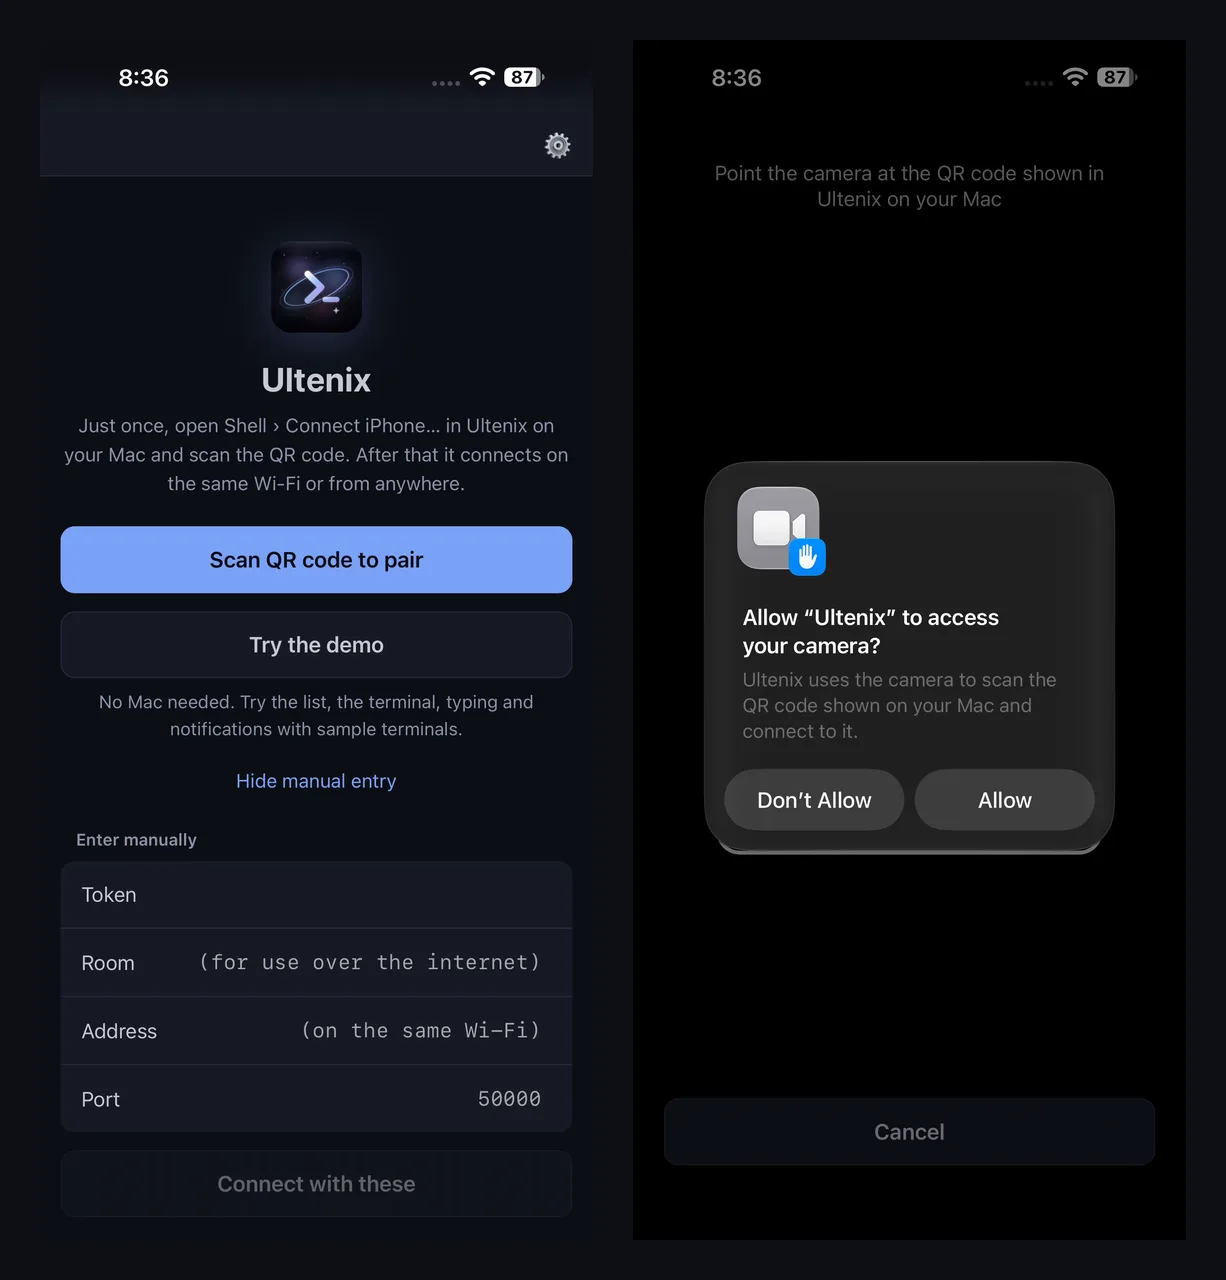
The Port field is not empty. It comes prefilled with the default, 50000. The first version tapped the field and typed. Xcode refused:
Failed to synthesize event: Neither element nor any descendant has keyboard focus. TextField, label: 'Port', placeholderValue: '50000', value: 50000
The tap landed, but the field did not take keyboard focus, so typeText had nowhere to go and the test stopped.
And even if it had typed, the new port would have been added after the old one.
The fix has two parts: check focus and tap again if needed, then delete what is there before typing.
private func fill(_ field: XCUIElement, _ text: String, clear: Int = 0) {
  app.coordinate(withNormalizedOffset: CGVector(dx: 0.5, dy: 0.06)).tap()
  pause(0.8)
  field.tap()
  pause(1.0)
  if !((field.value(forKey: "hasKeyboardFocus") as? Bool) ?? false) { field.tap(); pause(1.0) }
  field.typeText(String(repeating: XCUIKeyboardKey.delete.rawValue, count: clear) + text)
  pause(0.8)
}

// The Port field holds the default 50000. Delete it, then type
fill(fields.element(boundBy: 3), port, clear: 8)
hasKeyboardFocus is read through key value coding on the XCUIElement.
Eight delete keys is more than the five digits in the field, so it always ends empty.
Problem 2: the keyboard covers the next field
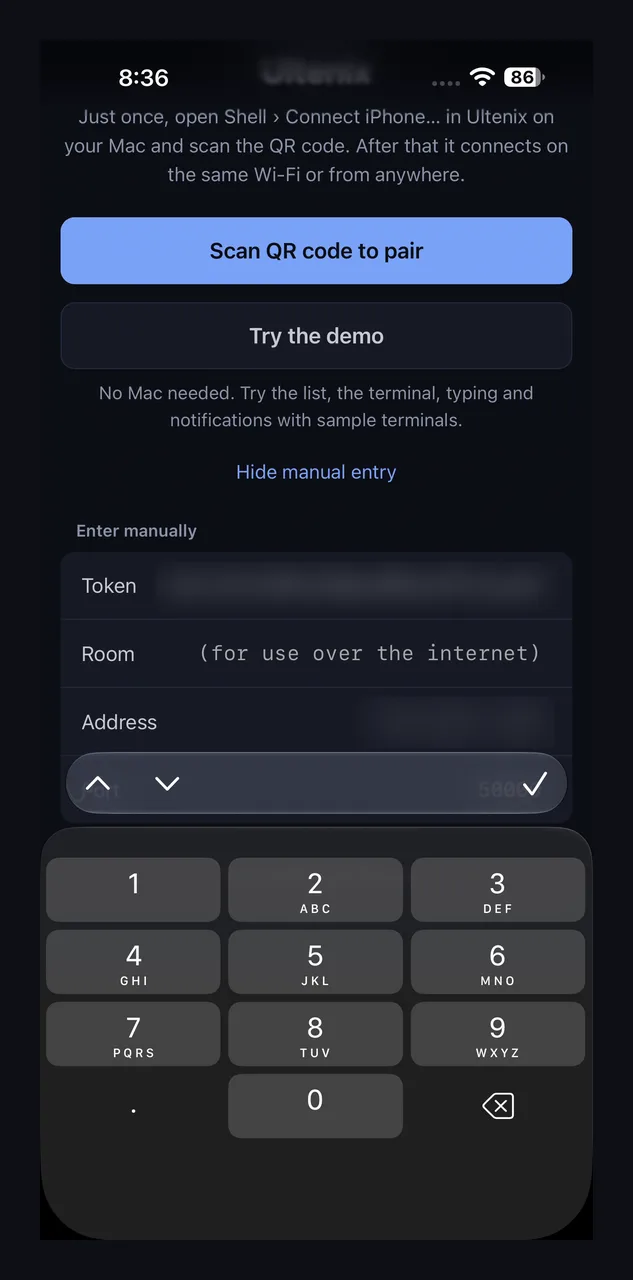
Run 2 got past the Port field and failed on Address with the same error. The cause was different.
After typing into one field, the keyboard stays up. On a 6.7 inch iPhone, the keyboard and its toolbar sit right on top of the lower fields and the "Connect with these" button. The test tapped a field that was under the keyboard.
The fix is the first line of fill() above: tap near the top of the screen first (6% down, in the middle), which closes the keyboard, then tap the field.
The same move happens once more before the Connect button.
// The keyboard hides "Connect with these", so close it first
app.coordinate(withNormalizedOffset: CGVector(dx: 0.5, dy: 0.06)).tap()
pause(1.5)
tap("Connect with these", wait: 1)
This is the only coordinate tap in the test. It taps an empty area on purpose, so a few pixels of drift cannot hit anything.
Problem 3: connecting before the permission
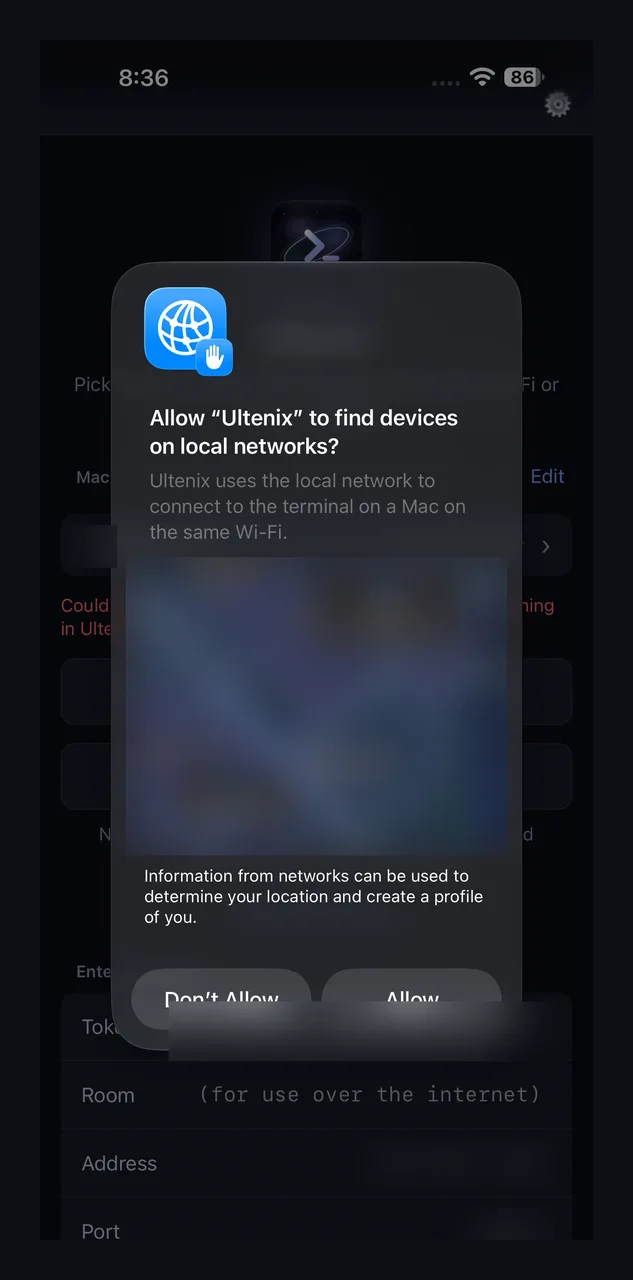
Runs 3 and 4 got further. They filled every field, pressed Connect, and then could not find the "+" button that opens a new terminal.
The screenshots showed why. On a fresh install, iOS asks "Allow Ultenix to find devices on local networks?" The app had already tried to connect before the answer came, and that first try ended with "Could not connect". The test accepted the dialog, but the app was still showing the error, not the terminal list.
The fix accepts the dialog, waits, and if the error is on screen, taps the Mac's row to connect again.
tap("Connect with these", wait: 1)
// Local Network permission
allowSystemAlert(timeout: 6)
pause(4)
// The app can try to connect before the dialog is answered and show "Could not connect".
// After allowing, tap the Mac's row to reconnect
if app.staticTexts.matching(NSPredicate(format: "label CONTAINS %@", "Could not connect")).firstMatch.exists {
  tap(host, wait: 5)
}
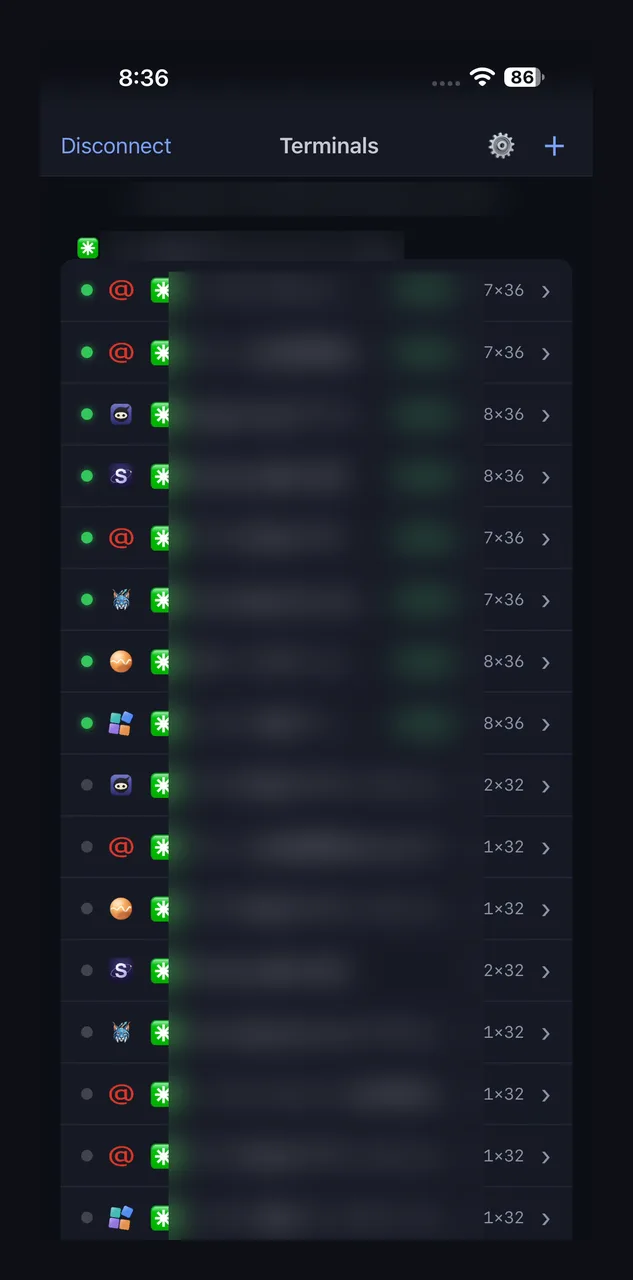
Run 5 passed this point and reached the terminal list. Real users only see that dialog once. A test that reinstalls the app sees it every time, so it has to handle it every time.
Problem 4: the script that died without a word
This one never reached the iPhone.
The script starts with set -euo pipefail.
That is good practice: stop on any error.
To find the Mac app's process, the first version used pgrep -x ultenix.
It was replaced with ps piped into awk, which matches the full path of the app's binary.
PID=$(ps -axo pid,comm | awk '/MacOS\/ultenix$/{print $1; exit}')
With pipefail, this line can kill the script with no message.
awk prints the first match and exits.
ps is still writing the rest of the process list into a pipe nobody reads, gets SIGPIPE, and exits with status 141.
pipefail reports that 141 as the status of the whole line, and set -e ends the script.
I checked it again today on my Mac, where ps -axo pid,comm prints 2,133 lines.
$ bash -c 'set -o pipefail; for i in $(seq 1 20); do ps -axo pid,comm | awk "NR==2{exit}"; echo -n "$? "; done'
141 141 141 141 141 141 141 141 141 141 141 141 141 141 141 141 141 141 141 141
Twenty out of twenty.
A small test script with set -euo pipefail and that line exited with 141 before printing anything.
The fix is two words: || true on the lines where an early exit is expected.
PID=$(ps -axo pid,comm | awk '/MacOS\/ultenix$/{print $1; exit}' || true)
PORT=$(lsof -nP -a -p "$PID" -iTCP -sTCP:LISTEN | awk 'NR>1{split($9,a,":");print a[2];exit}' || true)
The lsof line has the same shape, so it got the same fix.
Job two: App Store screenshots
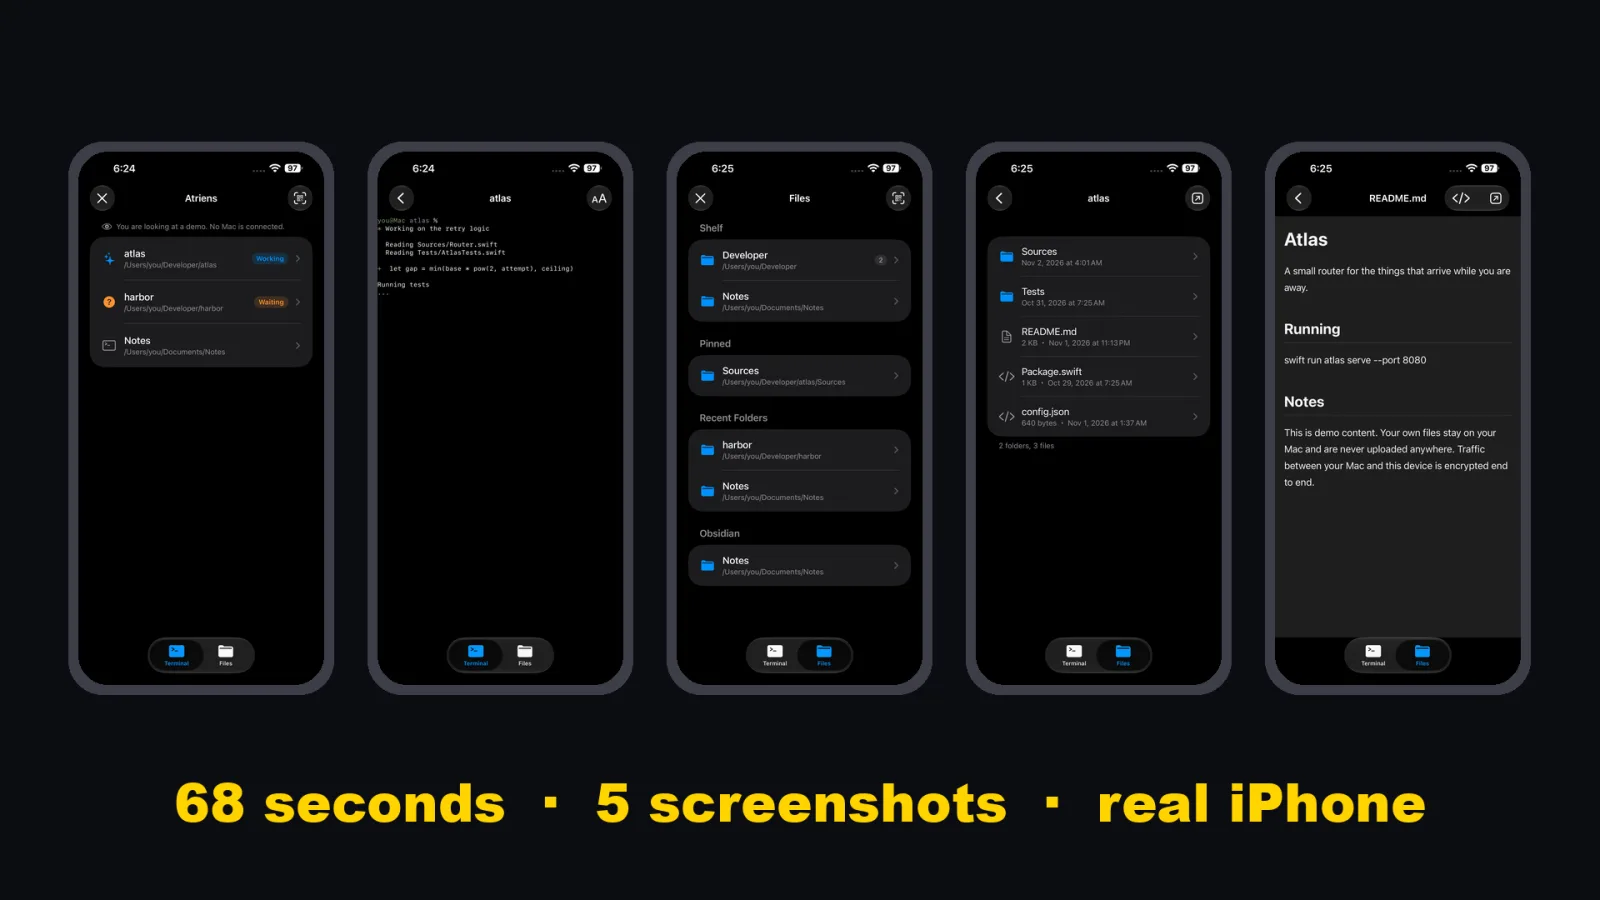
My other iPhone app, Atriens, needs App Store screenshots. They have to be the right size, show the right screens, and look the same in every language.
The test opens the app in demo mode with sample content, so no real Mac name or file ever appears. Then it walks five screens and saves each one.
app.launchArguments = ["-atriens-demo", "-atriens-no-keyboard", "-AppleLanguages", "(\(lang))", "-AppleLocale", lang]
app.launch()

save(app, "1-terminals")
tap(app, "atlas");       sleep(3); save(app, "2-terminal")
back(app)
tap(app, "Files");       sleep(2); save(app, "3-files")
tap(app, "Developer");   sleep(1)
tap(app, "atlas");       sleep(2); save(app, "4-directory")
tap(app, "README.md");   sleep(3); save(app, "5-readme")
save() is three lines: XCUIScreen.main.screenshot(), take the PNG data, write it to a file.
On November 2, on my iPhone 14 Pro Max, the five screenshots took 68 seconds. The language is a launch argument, so the same test makes the screenshots for another language too. The test is skipped in normal test runs unless an environment variable turns it on, so it never slows down everyday testing.
Job three: changing iPhone settings
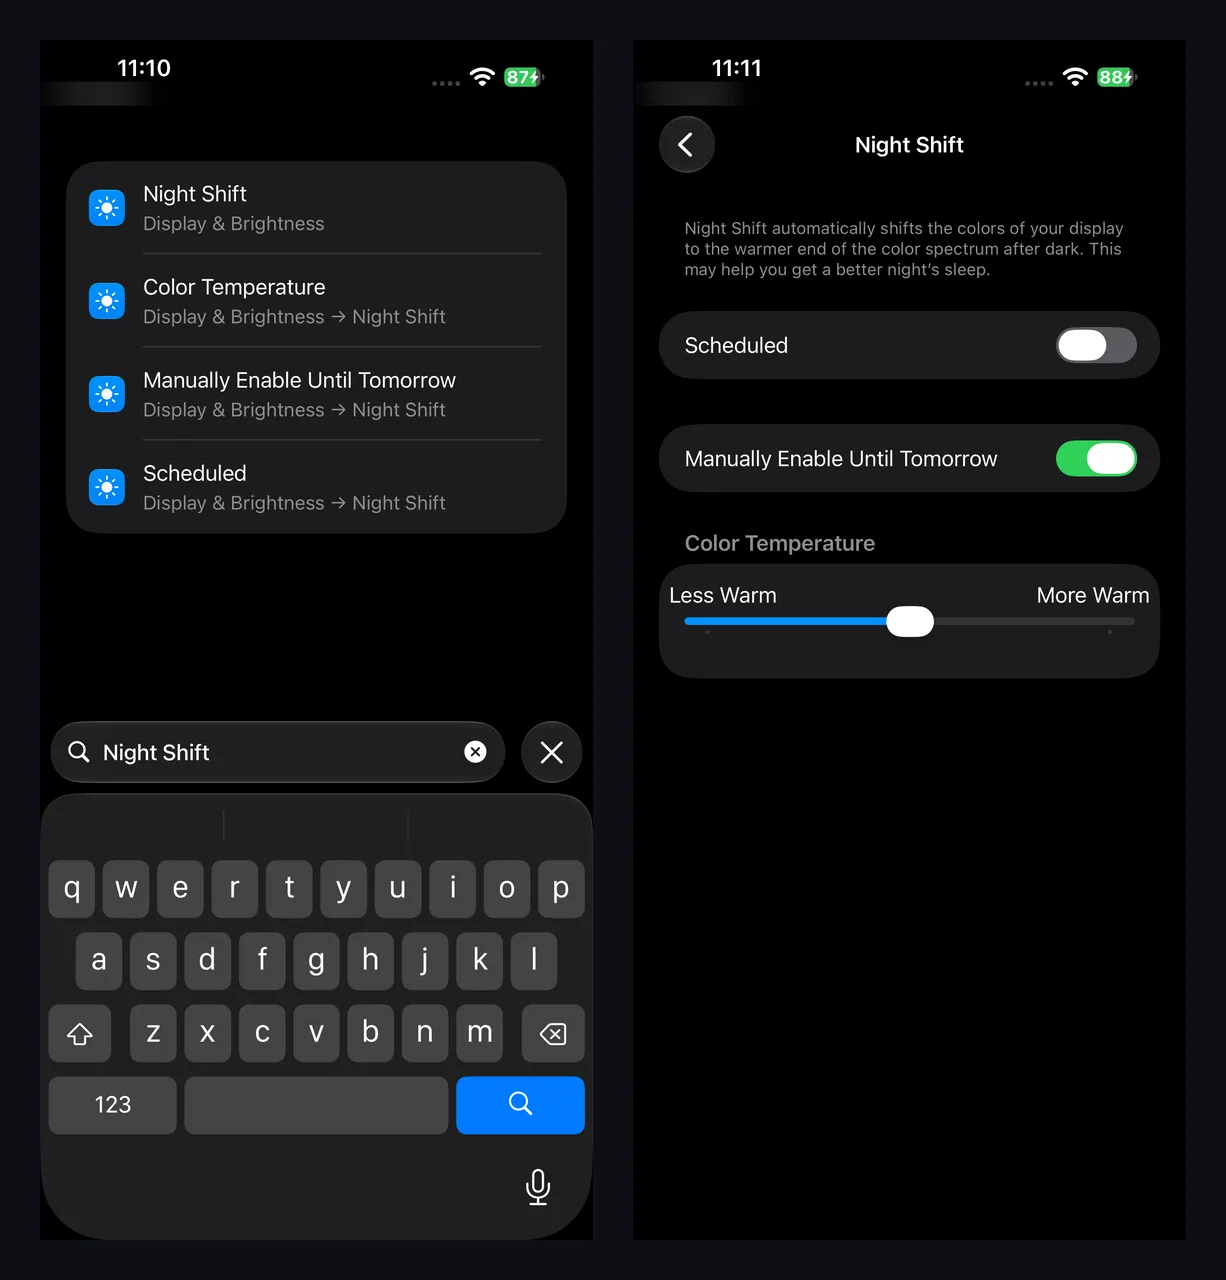
The same method works on Apple's own apps.
The Settings app is just another bundle ID, com.apple.Preferences.
xcrun devicectl device process launch --device <device-id> --terminate-existing com.apple.Preferences
On November 3, I asked for Night Shift. Claude Code opened Settings, typed "Night Shift" into the search field, opened the result, and turned on "Manually Enable Until Tomorrow". I turned it back off after filming.
I go through search instead of scrolling. The search result has a label, so the test can tap it by name.
House rules for letting an AI touch a phone
Letting an AI tap around your phone should feel a little scary. These are my rules.
| Rule | How it is enforced |
|---|---|
| Never touch a password field | A standing rule for every session: on a login screen it stops and asks me to sign in |
| Confirm which account is signed in | A separate check test reads the account name first. If it does not match, the script refuses to run the next step |
| One session per device | A lock file per device. A second session is stopped until the first one releases it |
| A screenshot after every tap | The test plan keeps every snapshot (keepAlways), so I can scroll back and see what it saw |
I run many Claude Code sessions at once, so the lock is not theory. Here is the simplest version of it.
# iphone_lock.sh start <who> / end / check
F=$HOME/.claude/state/iphone-busy
case $1 in
 start) echo "$2 $(date +%s)" > $F;;
 end) rm -f $F;;
 check) if [ -f $F ] && [ $(( $(date +%s) - $(cut -d' ' -f2 $F) )) -lt 3600 ]; then
          echo "In use: $(cut -d' ' -f1 $F)"; exit 1; fi
        echo "Free"; exit 0;;
esac
The lock expires after an hour, so a crashed session cannot block the phone forever. The newer version keys the lock by device ID and session ID, and refuses a different session within 15 minutes of the last use.
One more lesson from running two phones at once: give each device its own build folder (-derivedDataPath build-<device-id>).
On November 2, two sessions rebuilt the same folder for two iPhones at the same time, and one launch failed with "Developer App Certificate is not trusted".
What it can't do
To be fair about the limits:
- The iPhone has to be unlocked with the screen on, and connected by cable to a Mac with Xcode. If it locks in the middle, the test taps a black screen.
- It drives the screen. It does not get inside other apps' data, and it cannot do anything a finger could not do.
- Passwords, payments and anything with my accounts on the line stay with me. That is a rule, not a technical limit.
- One test at a time per device. A second session has to wait.
- It is slow on purpose. The pauses are there so a human, or an Apple reviewer, can follow the video. One run of the Mac connection takes well over a minute.
- Background interruptions still break runs. On October 23, a run on the iPhone 16 Pro Max failed with "Error getting main window kAXErrorServerNotFound" when the phone switched to another app in the middle.
- Labels change. When the app's text changes, the test has to change with it. Tapping by name makes that obvious instead of silent.
Try it yourself
The smallest version takes about an hour.
- Plug in your iPhone. Open Xcode once so it trusts the device.
- Make a new iOS project with a UI test target. The host app can be empty.
- In the test, create
XCUIApplication(bundleIdentifier: "<your app's bundle ID>"), calllaunch(), and save one screenshot. - Run it on the device:
xcodebuild test -project <Project>.xcodeproj -scheme <Scheme> \
  -destination "id=<device-id>" -resultBundlePath run1.xcresult
xcrun xcresulttool export attachments --path run1.xcresult --output-path run1.att
- Add
preferScreenCapturesOverScreenshots: trueto the test plan if you want a video. - Ask Claude Code to add one tap at a time, by label, and to look at the snapshot after each one.
Before you add more taps, add the rules. Keep password fields off limits. Check the account. One session per device.
To find your device ID, run xcrun devicectl list devices.
What's next
The review video for Ultenix goes back to Apple next. Run 5 already shows the real connection to the Mac. The next run has to get past the text size button and finish the script.
Ultenix is the Mac terminal I ran all of this in. It is built for AI agents like Claude Code, and I run Claude Code in it all day. It is free, and Pro is $7 a month. Pro is what lets you reach those same terminals from your iPhone, once the iPhone app is out.
The test runs are from November 2 and 3, 2026: an iPhone 14 Pro Max on iOS 27.2 and an iPhone 16 Pro Max on iOS 27.0.1. Times are from the Xcode test results. The pipefail check was run on macOS 27.0.1 on November 3, 2026.